When ceiling cracks or water stains appear, they can indicate structural damage that needs to be repaired. It is important to have these issues addressed by a professional to prevent further damage and potential health concerns.
Water stains on a ceiling may result from a plumbing leak, HVAC issue, or roofing problem. The source of the leak must be found and fixed to avoid further problems. Contact Ceiling Repairs Perth now!
Ceiling cracks can be an unsightly and often serious problem. They are more common in older buildings as the materials of structures shift and move over time. These shifts are caused by weather, aging of building materials, and other factors.
Fortunately, the majority of ceiling cracks are not structural problems. However, they are a sign that it’s time to call in a professional for a ceiling repair service. The cracks can be caused by a variety of issues, including normal building settling, substandard construction, and roof truss uplift.
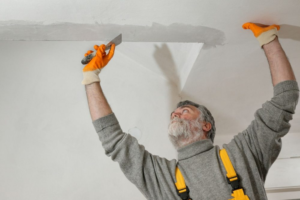
The first step in repairing a ceiling crack is to prep the area. This includes laying down a drop cloth or piece of plastic, as well as removing any dust or cobwebs from the ceiling. It is also important to make sure you have a stable ladder that can be used to work overhead.
Once the area is cleaned, it’s important to widen the crack so you can squash the new plaster into it. This is accomplished by using a putty knife and scraping the area, working about an inch on either side of the crack. Once you’ve widened the crack, it’s time to cover it with joint tape. This is an important step because it helps to ensure that the new patch will not fall off in the future.
After applying the joint compound and allowing it to dry, you’ll need to sand down the patched area to smooth it. Be careful not to sand too much, as this can cause the drywall to crumble. After sanding, it’s important to find a paint color that matches your ceiling so the repaired area blends in.
The most dangerous type of ceiling crack is one that leads to a sagging or dropping ceiling. This is usually the result of structural damage from underneath, such as a collapsed or uneven foundation. This type of damage can be very expensive to fix, so it’s essential to call in a professional for help right away. This type of problem is typically accompanied by door frames that stick, windows that won’t open, and sagging or bowing in the attic or wall joists.
Water Stains
When water stains appear on a ceiling, they indicate a problem that must be fixed immediately. Stains can lead to rot, mold, and a weaker house frame, so they are high-priority issues that need to be identified and fixed as soon as possible.
To identify the source of a water stain, first check if it’s near a sink, toilet, or other plumbing fixture. Leaking pipes can cause stains, as well as mold and mildew, so it’s important to find the source of the leak. You can also use your water bill to help pinpoint the source of a stain. If your bill is higher than usual, it could be an indication of a leaky pipe somewhere in the home.
Once you’ve found the source of the stain, remove any mold and mildew from the area and clean the spot thoroughly. It’s also a good idea to open up ceiling panels and dry the affected area out. This may involve using a dehumidifier in high humidity areas or simply opening up the roof vents. It’s important to ensure that the water stains and mold are completely removed before painting over them.
If you’re going to paint over a stained area, it’s important to choose a stain-blocking primer that can be applied to drywall and that is designed to resist moisture. Choosing the right primer will prevent the water stains from bleeding through your new coats of paint, and it will help your ceiling look blemish-free.
When painting over a water stain, it’s essential to use a paint that matches the color of the surrounding ceiling so it blends in seamlessly. It’s a good idea to apply multiple coats of paint, allowing each one to dry thoroughly before applying the next. It’s also a good idea, if possible, to use oil-based paint, as it will hold up better to moisture than water-based paint.
Loose Drywall
If water damage has caused the drywall on your ceiling to loosen, it’s important that you fully repair the drywall before it falls down. Otherwise, your home may suffer extensive damage that will lead to additional problems, like mold and mildew.
The best way to fix a loose ceiling is to first remove any light fixtures, electrical boxes or vents that are hanging from the drywall. Make sure that you have a friend or family member help you with this step so that you don’t accidentally knock them down or drop a nail or screw through the ceiling. Next, use a utility knife to cut along the seams where the drywall meets the ceiling. If you hit a joist or other support, stop cutting and find another spot on the ceiling to remove the drywall.
Once the drywall is removed, use a putty knife to clean up any remaining drywall dust and debris in the area. You can also sand the surface of the drywall to smooth any ridges or bumps and apply a new coat of lightweight joint compound. Once the new coat has dried, you can sand again and then prime and paint the repaired area.
Drywall cracks can occur in newly built homes for a variety of reasons. Most of these cracks are merely cosmetic and will not cause any structural issues for the home. However, if the cracks extend down from the ceiling to the wall, they are likely a sign of uneven foundation settlement and need to be addressed by a professional.
To fix a cracked drywall, first take a tape measure to determine the length and width of the damaged area. Then, cut out a piece of drywall that is two inches wider and longer than the original damaged section. Use a drywall saw to carefully cut the new piece of drywall to the proper size. Then, apply a layer of drywall adhesive to the back of the drywall before pressing it onto the ceiling. Once the drywall is secured, apply two more thin coats of joint compound to the surface. Sand the third coat once it has dried to smooth any ridges or bumps.
Mold
Mold growth is a common problem for ceilings, and it’s important to address it quickly as the longer you wait, the more damage it will do to your home’s structure. If you notice discolored spots on the ceiling or a musty smell, chances are there is mold present. However, it’s also possible that the mold growth is caused by a different issue such as condensation or humidity.
Before addressing the problem, make sure to take safety precautions and use a sturdy ladder or platform. You’ll need to wear protective gear such as a mask and goggles. In addition, you’ll need to remove the discolored area of the ceiling as well as clean the surrounding areas. Fortunately, if the affected area of the ceiling is small and concentrated, it may be possible to remove the mold with simple home remedies.
Identify the source of the mold by performing a moisture test using a moisture meter. A slight roof leak will eventually lead to a wet spot on the ceiling, but you should check to see if water actually drips from the drywall or at least the floor above. If the attic insulation is deteriorated, it could also be causing the problem, so you’ll need to replace it.
If the water spot on your ceiling is due to condensation, you’ll need to improve ventilation in the room above the ceiling. You can do this by opening windows and running a circulating fan. It’s also a good idea to increase the heat in that room during colder months.
To clean a small area of the ceiling with mold, mix a solution of one tablespoon of dishwashing liquid that does not contain ammonia or acids, 1/2 cup chlorine bleach, and water in a spray bottle. Spray or wipe the cleaning solution onto the ceiling, then rinse it with water to ensure that all of the solution and mold spores are removed from the surface. After the area has been cleaned, it’s a good idea to apply a borate-based solution or a mold-resistant primer to prevent future growth.